Saturday, November 26, 2011

Straw Bale Garden


New home, new garden. I questioned the soil that I had to work with, it has a clay like consistancy. And the area that I chose to place the garden, was already very wet. I didn't want the garden to completely fail. After googling how to make the soil better, how to build a raised garden, how to grow in clay, I was dismayed. Until, I happened to come across "how to grow a garden in a bale of hay". I was curious enough to jump at the chance to try it. Thus, this blog, about my experimental garden! Half  soil, half hay! 


Sod layer removed. Soil tilled and ready to plant.
Straw gardening has a few different rules than planting in regular soil.
                                        1. Use straw bales not hay (hay will start growing, straw will not grow as much as it has less seeds, if straw does start to grow, just clip with scissors)
                                        2. Bales can't be planted until you water them and add liquid nitrogen. Watering should be done for 10 days to allow the straw to start to decompose and create a good planting medium. After you try to find liquid nitrogen and find you can't, just find some dried blood and sprinkle it on the hay bales about 3 times during the 10 days of watering. This will give the straw nitrogen. 
                                        3. The straw bales will require a lot of watering in the beginning. Don't plant the plants in the straw until 10 or more days of watering. The longer the straw bales have to decompose the more your plants will thrive.
Straw bales in place and ready to be watered
I used already started plants in my straw bales. I separated the straw and placed the whole ball of soil that the plant was growing in into the straw. Eventually the roots will spread out into the straw but in the beginning it will use it's original dirt.

Plants doing well in soil & in straw bales
When i planted the plants. I did duplicate plants. Some in the soil and also some in the straw for a comparison of growth. I planted tomatoes, peppers, dill, zucchini, cucumbers, sunflowers (in soil only) and some marigolds to deter pests.

How I organized it

Soil areas along the back for snap pea seeds
The plan was to grow snap peas all along the back fence to optomize the gardening space.

Plants in the soil did better than I ever expected!

Mushrooms!
Because of how wet the hay bales remained, each morning I would be greeted with many many mushrooms!

snap peas sprout along with a few mushrooms.

Curious if the mushrooms were the demise of my snap peas

Snap Peas sprouted, but unfortunately that is all I ever got. they didn't do very well at all. 

happy little mushrooms (excuse my finger upper right)

Here is the garden near it's peak
At it's peak, I was collecting abundant tomatoes, peppers, cucumbers, jalepenos and zucchini. The cucumbers were the most prolific and growth was about the same in both the soil and the straw.

peppers were abundant in both the soil and the straw
Then… It happened. Hurricane Irene. The garden was flooded and never recovered. The sunflowers which were on one end all broke in half, the tomato plants turned brown and fell over. The only thing that survived and continued producing was the jalepeno plant.

Garden under about 10 inches of water during flood from hurricane Irene

After hurricane Irene flood. 

Nice thing is I'll be able to use the straw bales next year. From my research the straw bales are much more nutritious for the plants on the second year. Hopefully, another hurricane doesn't take it out! 

Thursday, November 24, 2011

Red spots on yellow flower

A normal morning for me. I walk out my door. Take a deep breath of fresh air. Glance at my newly planted herb garden. Thinking to myself : "Ah… the beauty and smell of these excellent plants. The portulacas look lovely. Oh, this is a lovely one, yellow with red spots….. wait…. spots… moving. *rub eyes*… spots still moving…." Sure that I hadn't done drugs, I take a closer look. At the new vantage point I can see that there are many tiny red spiders running around this little yellow blossom which is no bigger than a silver dollar. 

Here is the garden, as i saw it when i walked out the door. Note the yellow flower with red spots  in the foreground. 
A closer Look! 

Here is another look!
I believe that these spiders are called Red Spider Mites. I can't be certain, and they did no damage to my plants. They only stayed on this one particular flower and I did not see them again. From what I've read other people have had infestations of them. That wasn't my experience. I loved having them pass through!!! 

Poison Ivy


"What beautiful green foliage you have…….. the better to itch you with!"

This, is my first encounter with the dreaded poison ivy (Begin Bach's Tocatta Fugue in D minor). I may have come across it in my years of being in the woods, but this year is the first year it really GOT me! While weeding around our willow tree, which we now know was covered in Poison Ivy, I yanked pulled, and touched every part of the plant. A few little blisters showed up but I associated them with bug bites. Little did I know. While at work a patient said to me "oh, how did you get the poison ivy?" I was in denial!!!!!  The itch had been bothering me and a rash covering most of my inner arms, then my hips, belly and back of my legs.  Luckily i went to the Dr. right away and got a prescription for prednisone which probably kept it down. It still took a full 4 weeks for the rash to go away even after starting the prednisone within 7 days. My advice if you happen to encounter this plant are these things:
 1 .Wash right away with Tecnu (originally developed for nuclear fallout! what does that tell you about Poison Ivy!!!!)
2. If you start getting a rash and it seems to cover most of your body, just go to the doctor right away and get some prednisone so it doesn't progress too far
3. Calamine lotion is pretty but doesn't work. Get yourself a tube of Ivyrest it is fantastic! It makes the itch stop and cools and soothes. 
4. If the itch persists. Make an oatmeal bath. Take some plain old oatmeal, grind it in a food processor and stuff it in a sock. Throw the sock in a tub of water (i did hot water) and mush it around so it starts making a nice oatmeal milk. I got in the water and also rubbed the sock filled with oatmeal all over. This is good even if you don't have poison ivy!!!!! It's also less expensive than buying those packets of oatmeal bath in the store!
5. Buy some poison to kill the Ivy. I used Roundup specifically for poison ivy. Only had to use a tiny amount on a very small portion of each plant and it all died. The container of roundup is still pretty full so i'll be able to attack it again in the spring if it persists. My yard is about 3/4 of an acre and it was fairly covered in poison ivy once i started looking. The Roundup went a long way. 

Here are some of my photos of poison Ivy from my back yard. 
The poison ivy is that with three leaves noted at the top of the picture. There was also a vine of Virginia Creeper mixed with this, you can see that at the bottom of the photo with 5 leaves. 


Climbing up my house

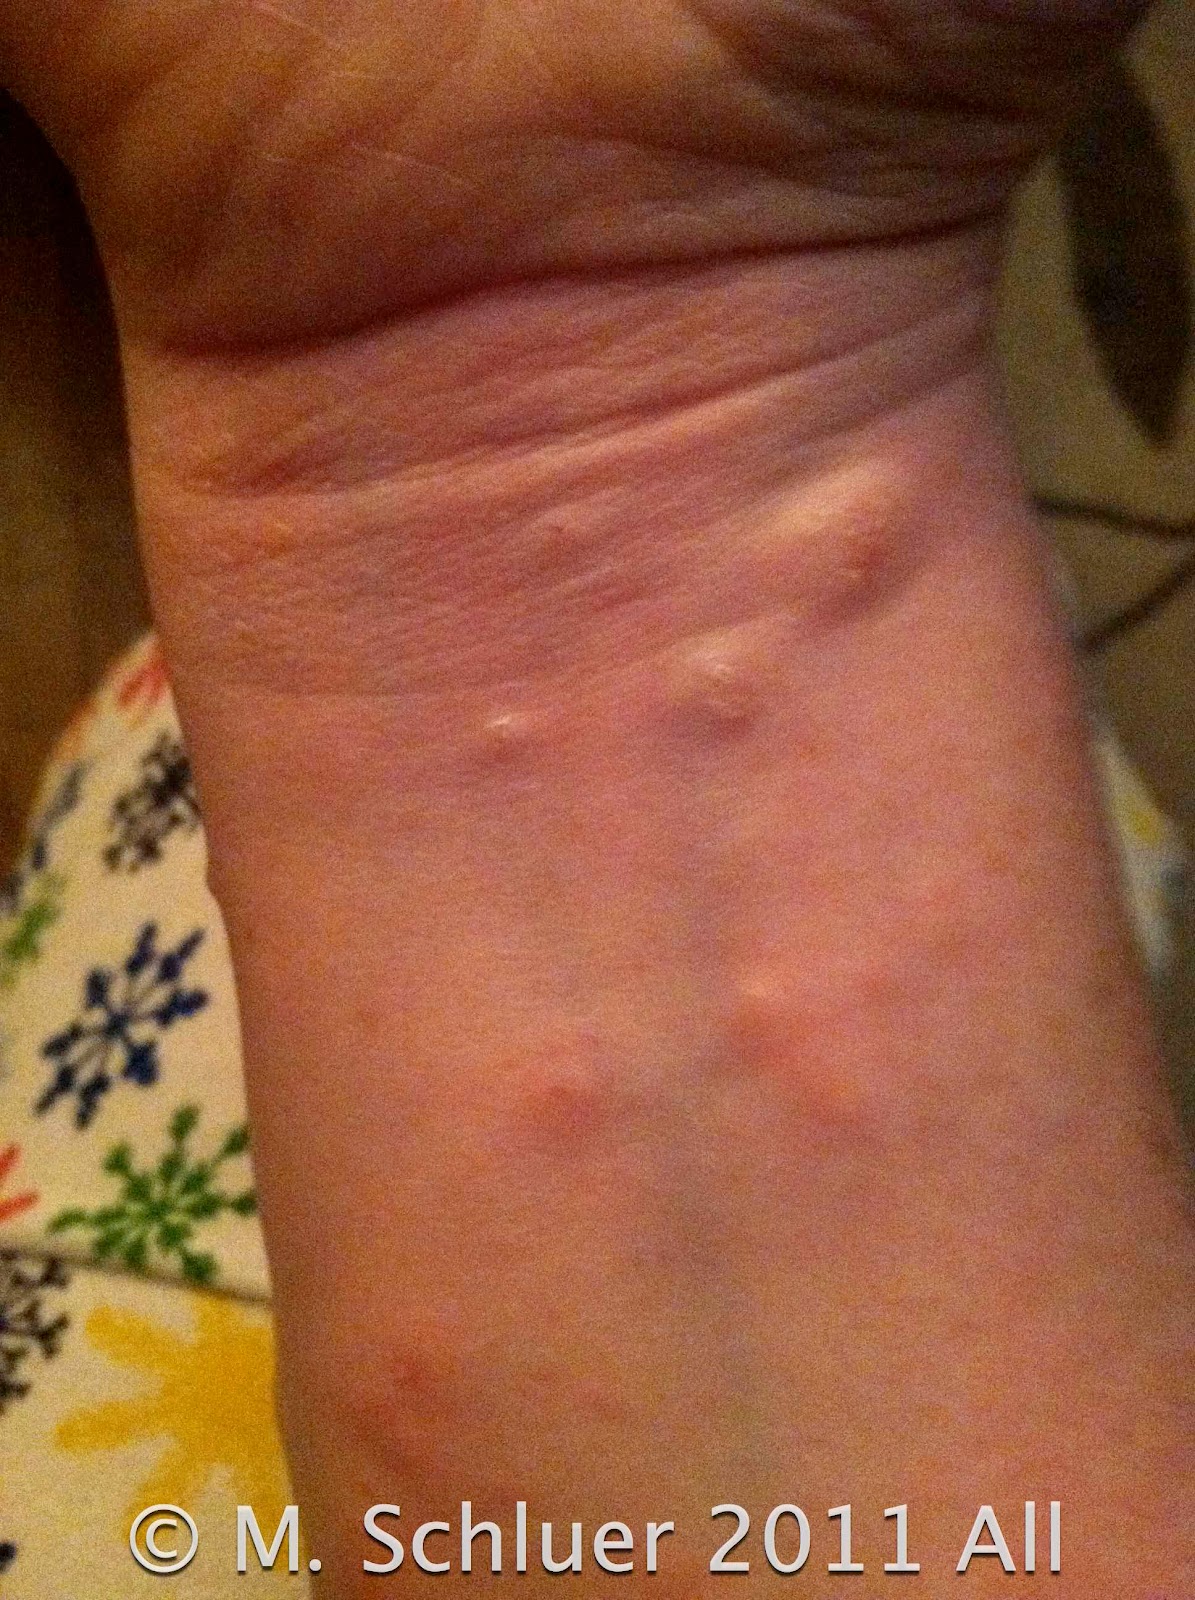
 To tell you the truth i didn't take photos at it's worst. I was too miserable. Here you can see the vesicles. 

This rash, was almost healed at this point

Saturday, July 16, 2011

Portulaca

Portulaca is a flower that my Grandmother and Great Grandmother loved planting in their gardens due to their variety of color. They are an easy flower to grow and you can enjoy the blooms all summer. They thrive in dry soil, because of their succulent type leaves.

They don't grow very tall, usually no taller than 6 inches (depending on variety). They make an excellent border plant do to their low growth.
 Portulaca can be grown very easily from their tiny little seeds. The trick is to lightly sprinkle the seeds over the top of the soil then gently mix the top 1/4 inch layer. Planting them too deep won't work. You can also take cuttings and root them fairly easily.

The photo above is a wonderful example of how i've used the portulaca this year to border my herb garden. They greet me every morning with lovely blooms!


These are planted in a small planter.

Friday, July 15, 2011

Lantana Flower

Here is a plant called a Lantana. I loved the blooms last year, so although it was labeled an annual I kept it in the cool basement all winter, giving it very little water and brought it back this year again to bloom! From what I've read, it is a cold weather annual and a warm weather 'tender' perennial. Seems to me the blooms vary in color depending on how much water it gets. I'll let you know if I learn more about it as I go. Experimenting is the key. I can't believe it survived my poor care this winter! 

I've seen these plants in many different colors and they attract many different butterflies. Someone mentioned that in warmer parts of Texas they grow very vigorously as annuals and sometimes become a nuisance. I could imagine them being a problem if they weren't the hybridized variety which these are. The original Lantana plants also had berries which made quite a mess. Those with the berries are not recommended because of the care they require to clean up after them. These, are no mess at all. I do clip off the dead blooms, being cautious not to chop off new blooms which start off very small. They bloom in pairs of two. And between the fork of the two stems is where the new bloom starts.

Thursday, July 14, 2011

Peach Tree Experiment


My newest experiement. I enjoyed eating these peaches, now lets see if i can get them to grow. Took these photos the day I planted them one week ago. So far, a week later nothing is peeking from the soil yet. I'll keep my hopes high! And I'll keep you posted!!! STAY TUNED!


Balloon Flower

I would love to tell you about this flower that I discovered last year. It is called a Balloon Flower or Platycodon. My mom picked it out because it was unusual and I know you will agree! It is a fairly hardy perennial.  The flower starts out as a green bud:

 It then slowly starts expanding to a larger "balloon" shape. Changing it's color the entire time. In the case of this particular balloon flower, green, very light shades of violet and then a robust purple! The photo below shows the many stages of the balloon:

 Here is a close up of the immature balloon:

It's amazing how quickly the change takes place. From green bud to full bloom (which you will see in a moment) in about 4-5 days. The plant requires a lot of watering at this stage. I've noticed that when it is blooming, it soaks up water like crazy.


Here we see how beautiful the purple balloon flower compliments the bright colors of the portulacas:


FULL BLOOM!


Once this flower unfurls it's lovely petals it is very delicate and doesn't last very long. It especially does not like to get wet or have the heat of the hot sun. The sun doesn't bother the actual green foliage, only the bloom. I've had it in full sun the entire time, and I do believe that if I moved it to a bit of shade the blooms would last longer. 


A beautiful flower I'll be happy to enjoy year after year! 

Thursday, June 30, 2011

Gardening from the heart

     The comfort that I find in familiar plants and even weeds is one of the greatest feelings in the world. I've grown up around plants, gardens, flowers and weeds. I am by no means an expert. But I am an enthusiast in every sense of the word! Born and raised in the Northeast United States means that the moment that a seed can sprout I make it happen. The minute I think the last frost has passed dirt starts flying! How significant in my psyche it is to hook up the gardening hose. From that point forward the season of gardening is ON and watch out plants here I come!
     Some of my earliest memories revolve around gardening with my Granny Em and my mom. Most of this revolved around houseplants. Spider plants, snake plants, geraniums (normally outdoor, but they winter in the house fairly well), African violets. If it could grow roots watch out! Mom would grow specific plants which were set aside so i could be handed a scissor and hack away at them. Unusual yes. Wonderful DOUBLE YES! It kept me from hacking away at any of the more important plants.  We would have little containers near the sink with single leaves, bound in the water by root tendrils waiting to be planted in dirt. As soon as the weather outside allowed it, everything would be moved out to the porch where plants,  that were semi alive in the house, could flourish!
     Here I am. Many years later touching plants whose great ancestors built my childhood memories. And every season I learn something new. Something more exciting. It is in this gardening world that I continue building on my knowledge and exploring new things. It is these plants that I want to share with you and hope that I can impart something, even if it is very small that you can grow with.