
Wednesday, June 12, 2013
Cabbage worms!!!
This morning while hanging out in my garden I noticed the cabbage, Brussel sprouts and broccoli had some holy leaves (no not religious!). Low and behold when I got down and investigated, about 10 of those plants had little green fuzzy worms. From about 1/4-1/2 inch long. Turns out these were cabbage worms and if I hadn't done some major squishing this morning, they would have kept snacking away! OYE!
Wednesday, May 29, 2013
Where There's a Will"ow" there's a Garden!
When we made the decision to purchase our home, we knew it was coming with one hefty task. The removal of one GIGANTIC willow tree. The tree, was beautiful. It gave our yard a lot of wonderful shade, the branches sang with the passing of the wind. Believe me I hated to see it go, but it had termites, and it towered over our house.
The raised bed, where the willow tree stood, had massive potential for something else in my life, But until the stump decayed below the dirt, I had to wait patiently and come up with a plan. Along with tackling the poison ivy that encompassed it (see previous blog!)
So, here we are. It is 2 years later. And I have finally decided to create…….
We dug 1.5 feet down to place the posts, and had no troubles with the stump or the roots. I had sprinkled some dried blood (Nitrogen) over this area numerous times in hopes that the roots would decompose and they definitely did.
 |
| Here is the old willow before her demise. She towered over the massive truck. |
 |
| You will notice the raised stone bed surrounding the tree. |
 |
| The tree was taken down in February when the ground was frozen so the trucks could drive on the yard. |
 |
| To fall the tree, they had to disassemble the stones around the raised bed. |
What else.. a GARDEN!!!!!!!
The mulch from the willow has now decomposed into a wonderful brown soil, there are weeds and a few sprigs of poison ivy but it's ready to be transformed. My first step was laying down some landscapers fabric to try to get a handle on some of the weeds and poison ivy that continue to haunt me.
 |
| Landscaping fabric and posts for trellis |
 |
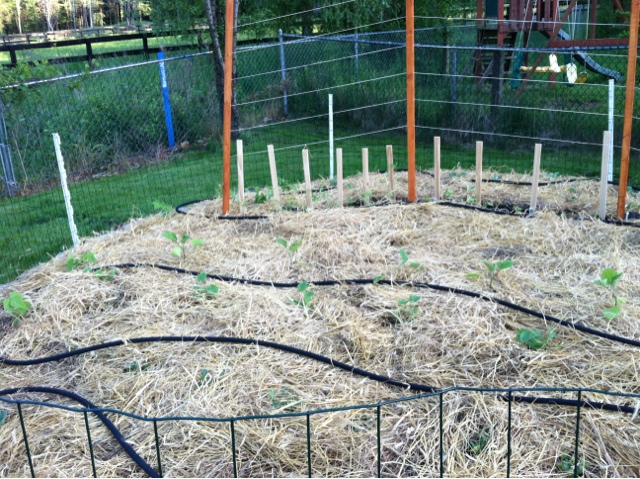
| Plants in through fabric, and rope added to trellis |
Cutting x's into the fabric, i scooped a hole and added some new compost, then planted the little babies. The trellis will be home to the snap peas, and cucumbers. Behind the trellis, broccoli, cauliflower, brussel sprouts, in front of the trellis, eggplants, zucchini, celery and cabbage. One yellow pear tomato on the right and some bush beans to the left! VEGGIES! YAYYYY
 |
| Blog after blog made me nervous so i covered it all in straw after planting, in hopes that my cabbage won't bolt. |
A 50 foot fence to keep the deer and bunnies from eating all my hard work and we are set!!!! Hello Gardening 2013 I'M ALL IN!!! Happy Gardening!!!
 |
| Feels like a worthy transformation… from Willow to Garden!!!! |
Saturday, November 26, 2011
Straw Bale Garden
New home, new garden. I questioned the soil that I had to work with, it has a clay like consistancy. And the area that I chose to place the garden, was already very wet. I didn't want the garden to completely fail. After googling how to make the soil better, how to build a raised garden, how to grow in clay, I was dismayed. Until, I happened to come across "how to grow a garden in a bale of hay". I was curious enough to jump at the chance to try it. Thus, this blog, about my experimental garden! Half soil, half hay!
 |
| Sod layer removed. Soil tilled and ready to plant. |
1. Use straw bales not hay (hay will start growing, straw will not grow as much as it has less seeds, if straw does start to grow, just clip with scissors)
2. Bales can't be planted until you water them and add liquid nitrogen. Watering should be done for 10 days to allow the straw to start to decompose and create a good planting medium. After you try to find liquid nitrogen and find you can't, just find some dried blood and sprinkle it on the hay bales about 3 times during the 10 days of watering. This will give the straw nitrogen.
3. The straw bales will require a lot of watering in the beginning. Don't plant the plants in the straw until 10 or more days of watering. The longer the straw bales have to decompose the more your plants will thrive.
I used already started plants in my straw bales. I separated the straw and placed the whole ball of soil that the plant was growing in into the straw. Eventually the roots will spread out into the straw but in the beginning it will use it's original dirt.
When i planted the plants. I did duplicate plants. Some in the soil and also some in the straw for a comparison of growth. I planted tomatoes, peppers, dill, zucchini, cucumbers, sunflowers (in soil only) and some marigolds to deter pests.
The plan was to grow snap peas all along the back fence to optomize the gardening space.
Because of how wet the hay bales remained, each morning I would be greeted with many many mushrooms!
 |
| Straw bales in place and ready to be watered |
 |
| Plants doing well in soil & in straw bales |
 |
| How I organized it |
 |
| Soil areas along the back for snap pea seeds |
 |
| Plants in the soil did better than I ever expected! |
 |
| Mushrooms! |
 |
| snap peas sprout along with a few mushrooms. |
 |
| Curious if the mushrooms were the demise of my snap peas |
Snap Peas sprouted, but unfortunately that is all I ever got. they didn't do very well at all.
 |
| happy little mushrooms (excuse my finger upper right) |
 |
| Here is the garden near it's peak |
At it's peak, I was collecting abundant tomatoes, peppers, cucumbers, jalepenos and zucchini. The cucumbers were the most prolific and growth was about the same in both the soil and the straw.
 |
| peppers were abundant in both the soil and the straw |
Then… It happened. Hurricane Irene. The garden was flooded and never recovered. The sunflowers which were on one end all broke in half, the tomato plants turned brown and fell over. The only thing that survived and continued producing was the jalepeno plant.
 |
| Garden under about 10 inches of water during flood from hurricane Irene |
 |
| After hurricane Irene flood. |
Nice thing is I'll be able to use the straw bales next year. From my research the straw bales are much more nutritious for the plants on the second year. Hopefully, another hurricane doesn't take it out!
Thursday, November 24, 2011
Red spots on yellow flower
A normal morning for me. I walk out my door. Take a deep breath of fresh air. Glance at my newly planted herb garden. Thinking to myself : "Ah… the beauty and smell of these excellent plants. The portulacas look lovely. Oh, this is a lovely one, yellow with red spots….. wait…. spots… moving. *rub eyes*… spots still moving…." Sure that I hadn't done drugs, I take a closer look. At the new vantage point I can see that there are many tiny red spiders running around this little yellow blossom which is no bigger than a silver dollar.
 |
| Here is the garden, as i saw it when i walked out the door. Note the yellow flower with red spots in the foreground. |
 |
| A closer Look! |
 |
| Here is another look! |
I believe that these spiders are called Red Spider Mites. I can't be certain, and they did no damage to my plants. They only stayed on this one particular flower and I did not see them again. From what I've read other people have had infestations of them. That wasn't my experience. I loved having them pass through!!!
Poison Ivy
"What beautiful green foliage you have…….. the better to itch you with!"

This, is my first encounter with the dreaded poison ivy (Begin Bach's Tocatta Fugue in D minor). I may have come across it in my years of being in the woods, but this year is the first year it really GOT me! While weeding around our willow tree, which we now know was covered in Poison Ivy, I yanked pulled, and touched every part of the plant. A few little blisters showed up but I associated them with bug bites. Little did I know. While at work a patient said to me "oh, how did you get the poison ivy?" I was in denial!!!!! The itch had been bothering me and a rash covering most of my inner arms, then my hips, belly and back of my legs. Luckily i went to the Dr. right away and got a prescription for prednisone which probably kept it down. It still took a full 4 weeks for the rash to go away even after starting the prednisone within 7 days. My advice if you happen to encounter this plant are these things:
1 .Wash right away with Tecnu (originally developed for nuclear fallout! what does that tell you about Poison Ivy!!!!)
2. If you start getting a rash and it seems to cover most of your body, just go to the doctor right away and get some prednisone so it doesn't progress too far
3. Calamine lotion is pretty but doesn't work. Get yourself a tube of Ivyrest it is fantastic! It makes the itch stop and cools and soothes.
4. If the itch persists. Make an oatmeal bath. Take some plain old oatmeal, grind it in a food processor and stuff it in a sock. Throw the sock in a tub of water (i did hot water) and mush it around so it starts making a nice oatmeal milk. I got in the water and also rubbed the sock filled with oatmeal all over. This is good even if you don't have poison ivy!!!!! It's also less expensive than buying those packets of oatmeal bath in the store!
5. Buy some poison to kill the Ivy. I used Roundup specifically for poison ivy. Only had to use a tiny amount on a very small portion of each plant and it all died. The container of roundup is still pretty full so i'll be able to attack it again in the spring if it persists. My yard is about 3/4 of an acre and it was fairly covered in poison ivy once i started looking. The Roundup went a long way.
Here are some of my photos of poison Ivy from my back yard.
 |
| The poison ivy is that with three leaves noted at the top of the picture. There was also a vine of Virginia Creeper mixed with this, you can see that at the bottom of the photo with 5 leaves. |

 |
| Climbing up my house |
 |
| To tell you the truth i didn't take photos at it's worst. I was too miserable. Here you can see the vesicles. |
| This rash, was almost healed at this point |
Saturday, July 16, 2011
Portulaca


They don't grow very tall, usually no taller than 6 inches (depending on variety). They make an excellent border plant do to their low growth.


The photo above is a wonderful example of how i've used the portulaca this year to border my herb garden. They greet me every morning with lovely blooms!
 |
| These are planted in a small planter. |

Friday, July 15, 2011
Lantana Flower

Here is a plant called a Lantana. I loved the blooms last year, so although it was labeled an annual I kept it in the cool basement all winter, giving it very little water and brought it back this year again to bloom! From what I've read, it is a cold weather annual and a warm weather 'tender' perennial. Seems to me the blooms vary in color depending on how much water it gets. I'll let you know if I learn more about it as I go. Experimenting is the key. I can't believe it survived my poor care this winter!

I've seen these plants in many different colors and they attract many different butterflies. Someone mentioned that in warmer parts of Texas they grow very vigorously as annuals and sometimes become a nuisance. I could imagine them being a problem if they weren't the hybridized variety which these are. The original Lantana plants also had berries which made quite a mess. Those with the berries are not recommended because of the care they require to clean up after them. These, are no mess at all. I do clip off the dead blooms, being cautious not to chop off new blooms which start off very small. They bloom in pairs of two. And between the fork of the two stems is where the new bloom starts.

Subscribe to:
Posts (Atom)